自定义View之scroll系列方法

前言

本篇的主要目的有如下几点:

  • 记录一下scroll系列中各个方法(scrollTo,scrollBy,setScrollX,setScrollY,getScrollX,getScrollY)的作用
  • scroll方法中正负值代表方向的理解与记忆方式

scroll值的正负理解

scroll方法记忆方式

个人感觉,scroll系列中各个方法的由来是因为布局有大小,但是布局内的内容可以无限大从而大于布局的大小。所以需要scroll系列方法来移动显示区域内的内容。

scroll方法针对的是view中的内容。
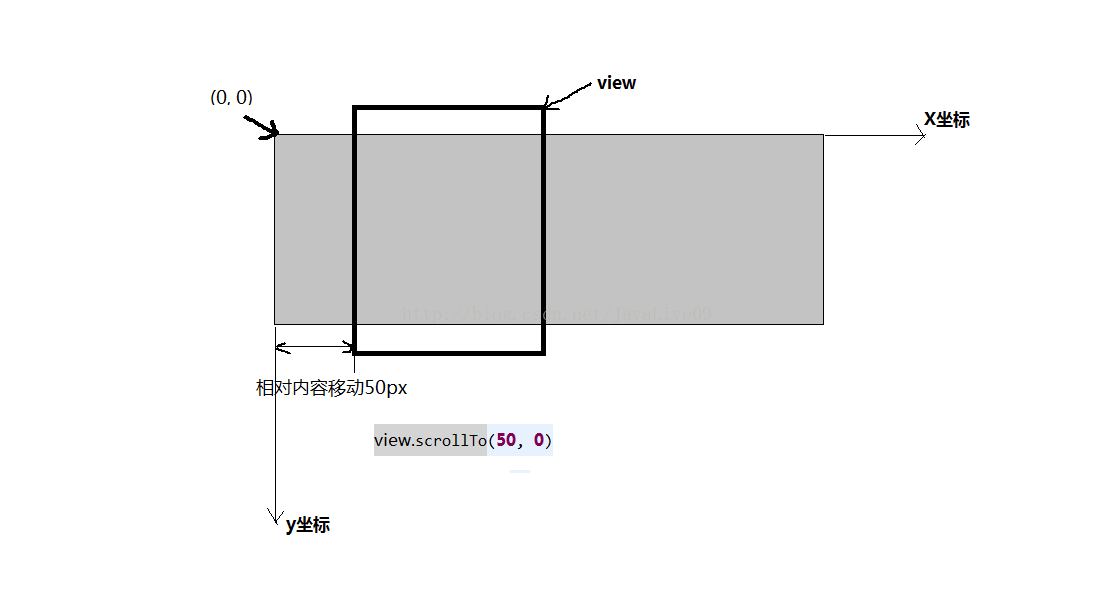
如view.scrollTo(50,0); 表示的是针对内容的(0,0)坐标view滚动了50个像素到(50,0)。
也就是将view的可视区域向右移动到(50,0)处。展现的是,内容向左边移动了50个像素。
可以抽象地理解为屏幕与屏幕上的内容。

打个比方:

view的内容好比是一张画,而view是画上的一个放大镜。

以画的左上角为原点,原点向右为X轴正方向,原点向下为Y轴正方向,建立坐标系。

放大镜初始位置在(0,0)处。

scrollTo(50,0)就是把放大镜向右移到(50,0)处,让放大镜显示(50,0)处的内容。

这个过程中,如果将放大镜看作是静止的,就是画左移了50个单位长度。

scroll系列方法

首先来说一下scroll各方法都是对View中的两个成员变量进行修改,分别是

  • mScrollX 表示X轴方向(水平方向)的偏移量。正:内容向左移动,相当于手指在屏幕上从右往左拖动内容;负,则相反。
  • mScrollY 表示Y轴方向(垂直方向)的偏移量。正:内容向上移动,相当于手指在屏幕上从下往上拖动内容;负,则相反。

注:scroll系列各方法产生的内容移动效果都是瞬间完成的。如需实现平滑移动效果,请查看下篇文章 《自定义View之Scroller》

1
2
3
4
5
6
7
8
9
10
11
12
13
14
15
16
17
18
19
20
21
22
23
24
25
26
27
28
29
30
31
32
33
34
35
36
37

/**
* The offset, in pixels, by which the content of this view is scrolled
* horizontally.
* {@hide}
*/
@ViewDebug.ExportedProperty(category = "scrolling")
protected int mScrollX;
/**
* The offset, in pixels, by which the content of this view is scrolled
* vertically.
* {@hide}
*/
@ViewDebug.ExportedProperty(category = "scrolling")
protected int mScrollY;
/**
* Return the scrolled left position of this view. This is the left edge of
* the displayed part of your view. You do not need to draw any pixels
* farther left, since those are outside of the frame of your view on
* screen.
*
* @return The left edge of the displayed part of your view, in pixels.
*/
public final int getScrollX() {
return mScrollX;
}

/**
* Return the scrolled top position of this view. This is the top edge of
* the displayed part of your view. You do not need to draw any pixels above
* it, since those are outside of the frame of your view on screen.
*
* @return The top edge of the displayed part of your view, in pixels.
*/
public final int getScrollY() {
return mScrollY;
}

scrollTo(int x, int y)

将当前视图内容偏移至(x , y)坐标处,即显示(可视)区域位于(x , y)坐标处。

1
2
3
4
5
6
7
8
9
10
11
12
13
14
15
16
17
18
19
20
/**
* Set the scrolled position of your view. This will cause a call to
* {@link #onScrollChanged(int, int, int, int)} and the view will be
* invalidated.
* @param x the x position to scroll to
* @param y the y position to scroll to
*/
public void scrollTo(int x, int y) {
if (mScrollX != x || mScrollY != y) {
int oldX = mScrollX;
int oldY = mScrollY;
mScrollX = x;
mScrollY = y;
invalidateParentCaches();//让该视图的父视图清除对该视图的缓存
onScrollChanged(mScrollX, mScrollY, oldX, oldY);//回调方法
if (!awakenScrollBars()) {
postInvalidateOnAnimation();//刷新
}
}
}

scrollBy(int x, int y)

可以看到scrollBy内部调用了scrollTo方法,只是在当前mScrollX和mScrollY的基础上去偏移。

1
2
3
4
5
6
7
8
9
10
/**
* Move the scrolled position of your view. This will cause a call to
* {@link #onScrollChanged(int, int, int, int)} and the view will be
* invalidated.
* @param x the amount of pixels to scroll by horizontally
* @param y the amount of pixels to scroll by vertically
*/
public void scrollBy(int x, int y) {
scrollTo(mScrollX + x, mScrollY + y);
}

setScrollX(int value),setScrollY(int value)

setScrollX,setScrollY分别是对X轴方向和Y轴方向进行偏移。

1
2
3
4
5
6
7
8
9
10
11
12
13
14
15
16
17
18
19
/**
* Set the horizontal scrolled position of your view. This will cause a call to
* {@link #onScrollChanged(int, int, int, int)} and the view will be
* invalidated.
* @param value the x position to scroll to
*/
public void setScrollX(int value) {
scrollTo(value, mScrollY);
}

/**
* Set the vertical scrolled position of your view. This will cause a call to
* {@link #onScrollChanged(int, int, int, int)} and the view will be
* invalidated.
* @param value the y position to scroll to
*/
public void setScrollY(int value) {
scrollTo(mScrollX, value);
}

Scroll方法使用示例

scroll示例

布局文件 activity_main.xml

1
2
3
4
5
6
7
8
9
10
11
12
13
14
15
16
17
18
19
20
21
22
<?xml version="1.0" encoding="utf-8"?>

<LinearLayout xmlns:android="http://schemas.android.com/apk/res/android"
xmlns:tools="http://schemas.android.com/tools"
android:id="@+id/layout"
android:layout_width="match_parent"
android:layout_height="wrap_content"
android:orientation="vertical"
tools:context="com.nhtzj.myapplication.scroller.ScrollerActivity">

<Button
android:id="@+id/scroll_by_btn"
android:layout_width="wrap_content"
android:layout_height="wrap_content"
android:text="scrollBy" />

<Button
android:id="@+id/scroll_to_btn"
android:layout_width="wrap_content"
android:layout_height="wrap_content"
android:text="scrollTo" />
</LinearLayout>

MainActivity代码

1
2
3
4
5
6
7
8
9
10
11
12
13
14
15
16
17
18
19
20
21
22
23
24
25
26
27
28
public class MainActivity extends AppCompatActivity {

private LinearLayout layout;

private Button scrollToBtn;
private Button scrollByBtn;

@Override
protected void onCreate(Bundle savedInstanceState) {
super.onCreate(savedInstanceState);
setContentView(R.layout.activity_main);
layout = (LinearLayout) findViewById(R.id.layout);
scrollToBtn = (Button) findViewById(R.id.scroll_to_btn);
scrollByBtn = (Button) findViewById(R.id.scroll_by_btn);
scrollToBtn.setOnClickListener(new View.OnClickListener() {
@Override
public void onClick(View v) {
layout.scrollTo(-60, -100);//从当前位置移动到(-60, -100)坐标处。
}
});
scrollByBtn.setOnClickListener(new View.OnClickListener() {
@Override
public void onClick(View v) {
layout.scrollBy(-60, -100);//每调用一次,都会在之前的基础上往右下角移动。
}
});
}
}
坚持原创技术分享,您的支持是对我最大的鼓励!